This is not an official guide
~ using ibaCapture 5.7.0 and Axis P1468-LE Bullet camera
Before
- create a folder in your C drive where we can save all the files
- install OpenSSL: https://openssl-library.org/source/
Step 1: In the Axis camera
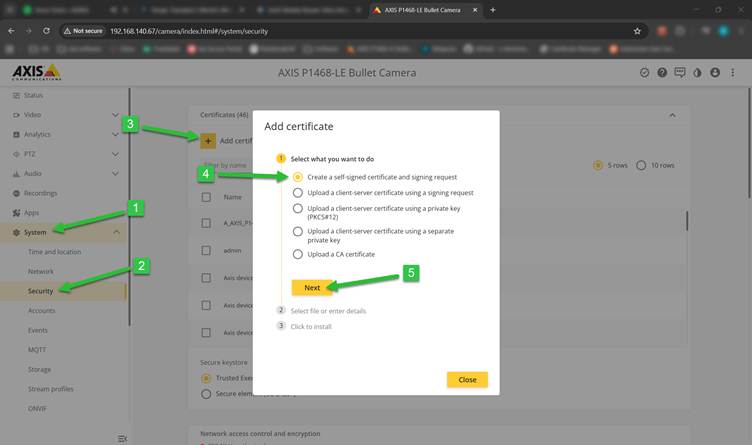
I. Navigate to your Axis camera using a browser (ex: 192.168.140.67) and go to:
- System
- Security
- Add certificate
- Create a self-signed certificate request and signing request
- Click "Next"
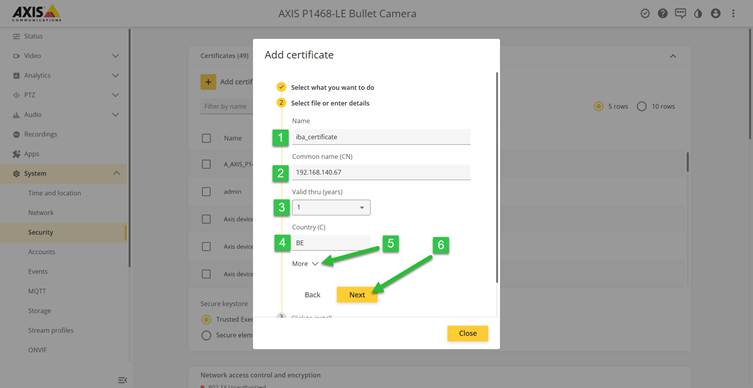
II. Fill in the empty fields:
- Name
- Common name: take the IP address of the camera
- Valid thru (years)
- Country (C): 2 characters e.g., BE = Belgium
- More: (optional: city, state etc.)
- Choose "Next"
- Click "Save"
- Click “Close”
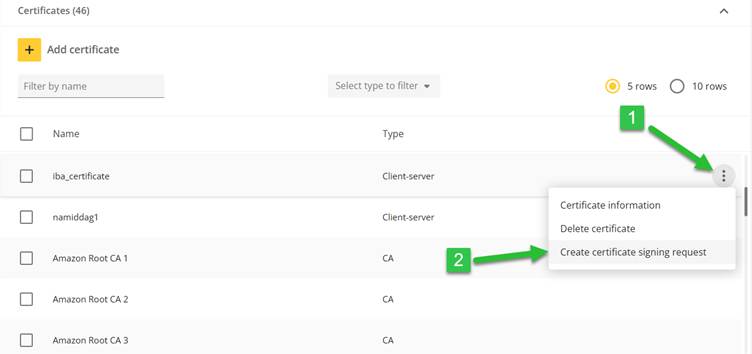
III. Navigate to your certificates:
- Click the 3 dots of the certificate you just made
- Select "create certificate signing request"
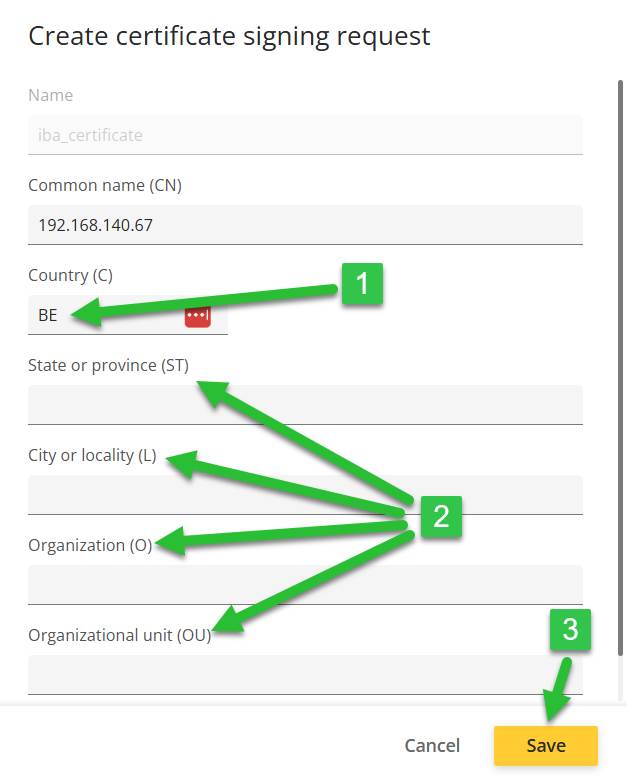
IV. Create certificate signing request:
- Fill in the country (2 characters)
- Optional: city, state etc.
- Click "save"
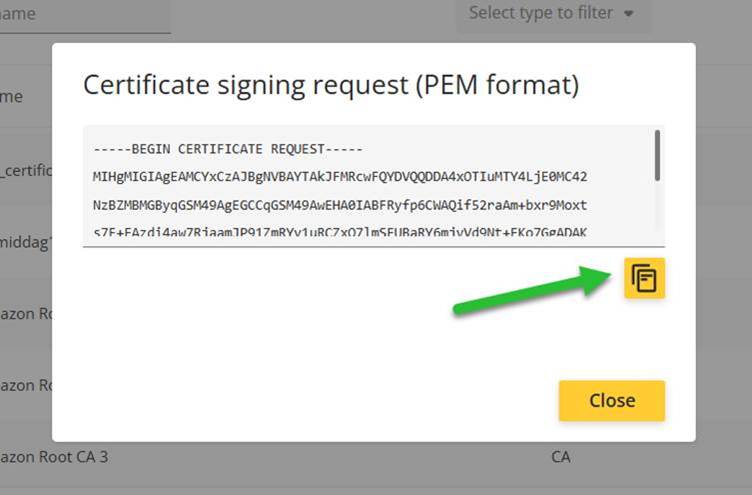
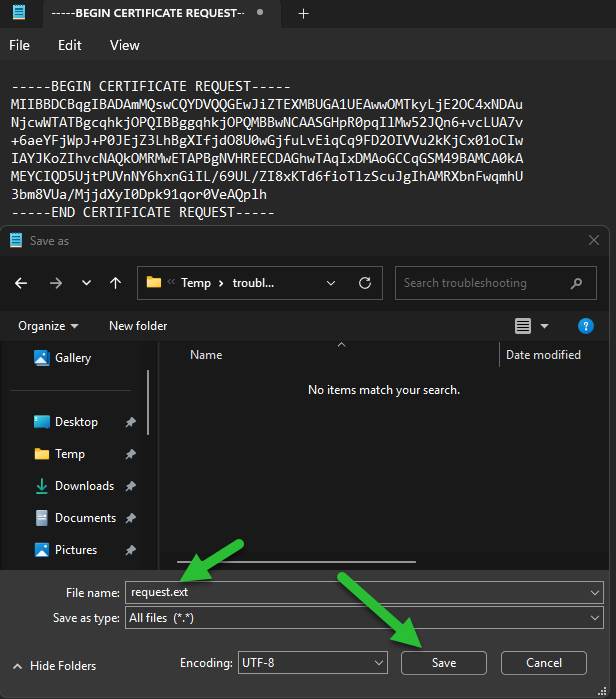
V. Copy the certificate signing request (PEM format) to notepad and save it as “request.ext” in your folder
Step 2: In ibaCapture
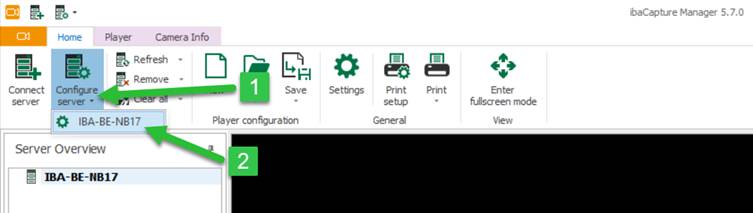
VI. Open ibaCapture and go to:
- Configure server
- *your server*
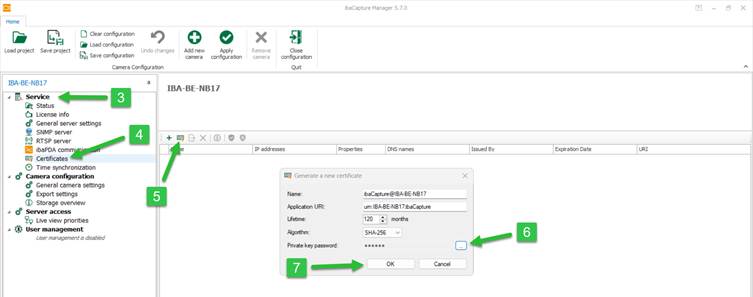
- Service
- Certificates
- Generate a certificate
- Click the 3 dots, fill in a password and click “OK”
(don't forget the password, you'll need it multiple times) - Click “OK”
VII. Generate private key:
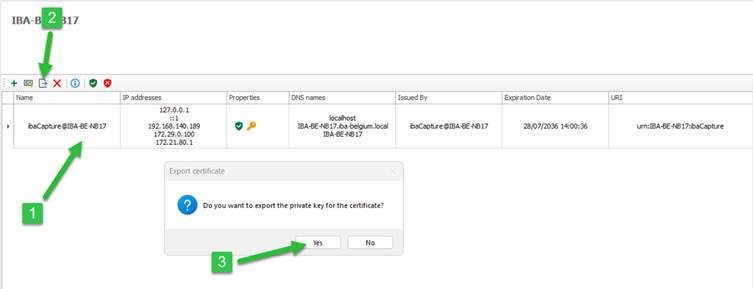
- Select the certificate
- Click "Export the selected certificate to a file"
- "do you want to export the private key for the certificate" select "Yes"
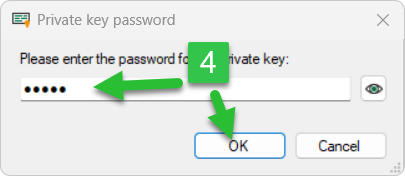
- Enter the password you created and click “OK”
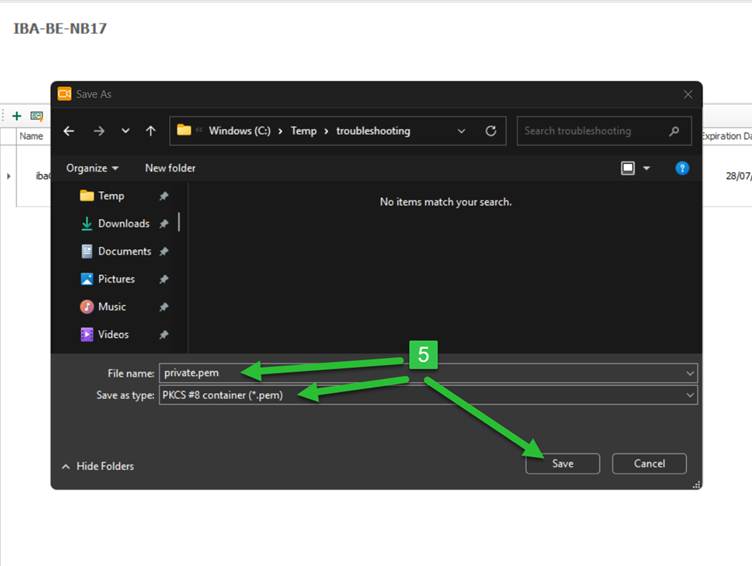
- Navigate to your folder and save the file as "private.pem"
VIII. Generate public key:
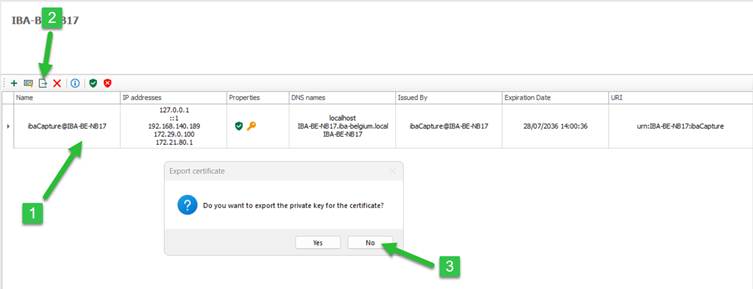
- Select the certificate
- Click "Export the selected certificate to a file"
- "do you want to export the private key for the certificate" select "No"
- Navigate to your folder and save the file as "public.crt"
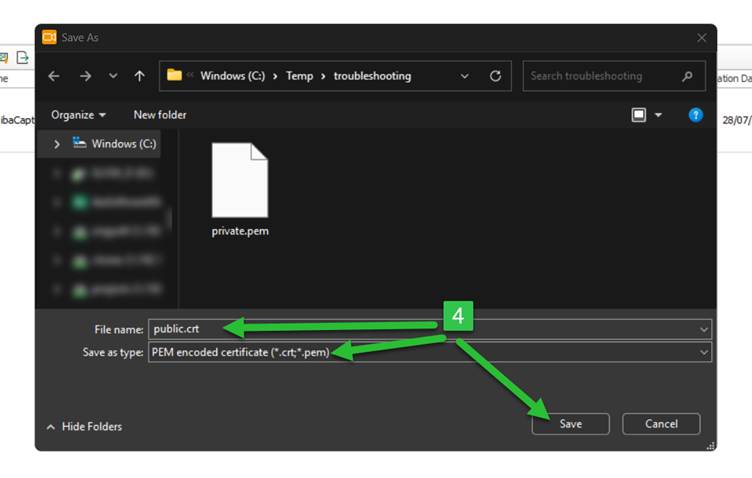
Step 3: In your folder
IX. Open a new notepad file named "san.ext" and place this in your folder (change the IP to the IP of your Axis camera):
authorityKeyIdentifier=keyid,issuer
basicConstraints=CA:FALSE
keyUsage = digitalSignature, nonRepudiation, keyEncipherment, dataEncipherment
subjectAltName = @alt_names
[alt_names]
IP.1 = 192.168.140.67
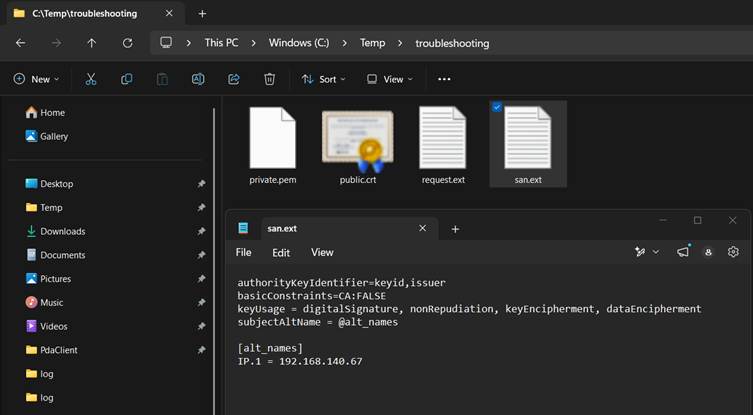
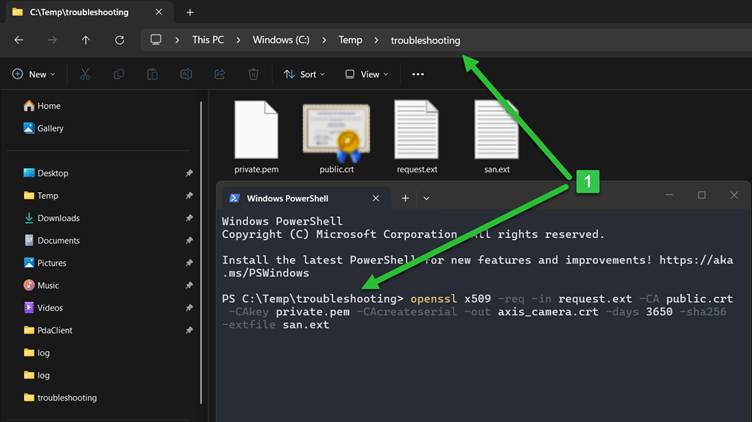
X. PowerShell command
- Open in your folder a Powershell window paste the following command:
openssl x509 -req -in request.ext -CA public.crt -CAkey private.pem -CAcreateserial -out axis_camera.crt -days 3650 -sha256 -extfile san.ext - Press enter on your keyboard
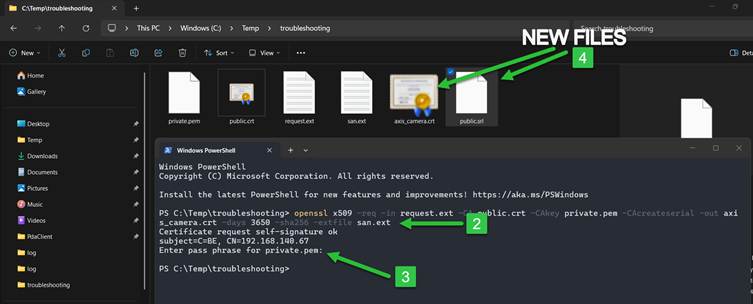
- PowerShell will ask for your pass phrase for the private.pem file, fill in the password you created in ibaCapture and press enter on your keyboard
(you can't see what you type so be correct!) - You should get 6 files in total, 2 new ones generated using PowerShell
NOTE: If your screen looks like the image below, it worked!
Possible errors are:
- missing files
- OpenSSL not installed
- passphrase wrong
Step 4: Back in the Axis camera
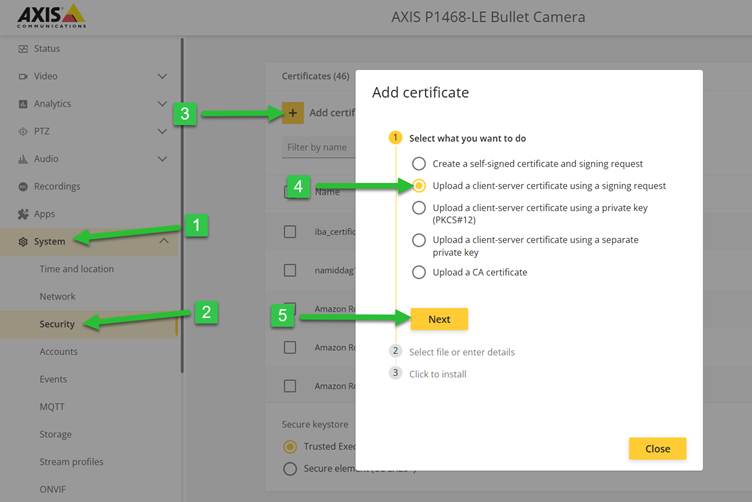
XI. Navigate to your Axis camera using a browser (ex: 192.168.140.67) and go to:
- System
- Security
- Add certificate
- Upload a client-server certificate using a signing request
- Click "Next"
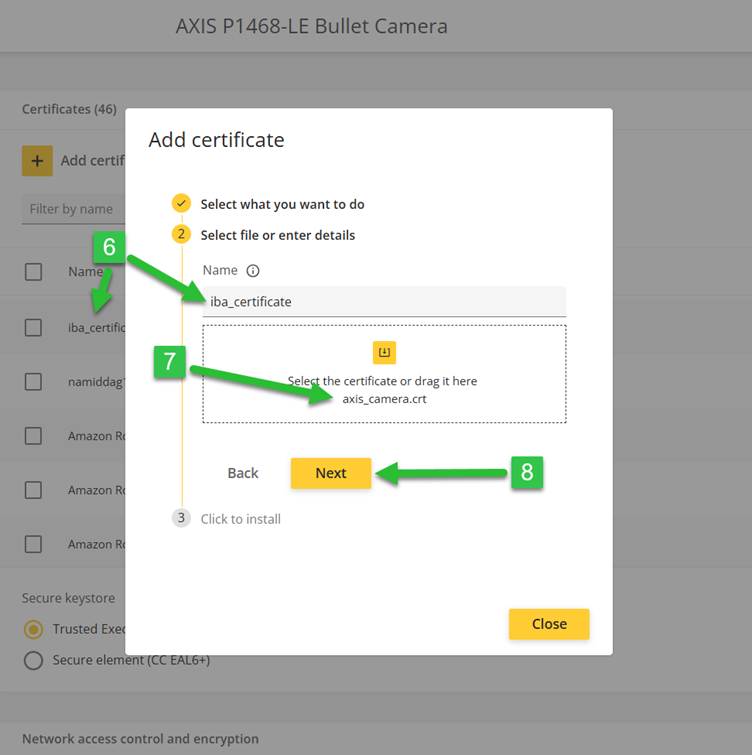
- Fill in the exact name of the certificate you generated in the camera before
- Select the axis_camera.crt from in your folder
- Click "next" and "finish", you should get a success message
XII. Activate certificate
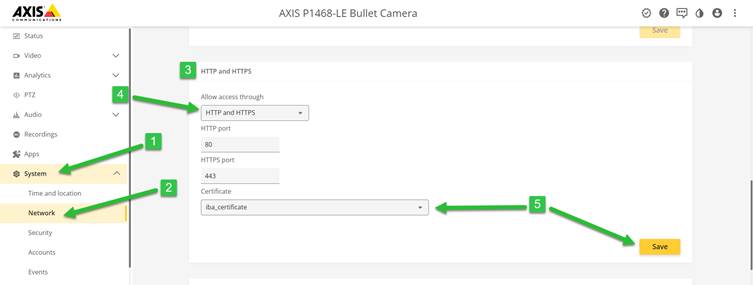
- System
- Network
- HTTP and HTTPS
- Change the "allow access through" from "HTTP" to "HTTP and HTTPS"
(you can later change it to only HTTPS if the connection works) - Select the certificate you created and click "save"
Note: check if the HTTPS port of the camera can be reached:
Open PowerShell and paste (change IP and port):
test-netconnection 192.168.140.67 -port 443
Check firewall rules if necessary!
Step 5: Back in your folder
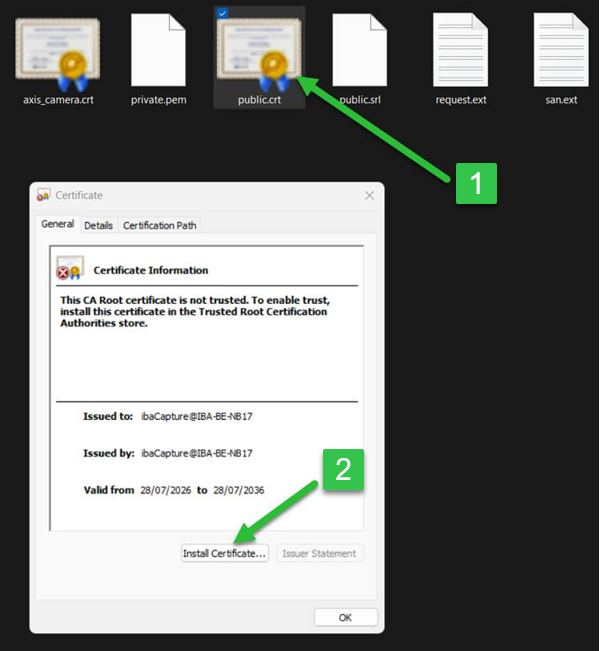
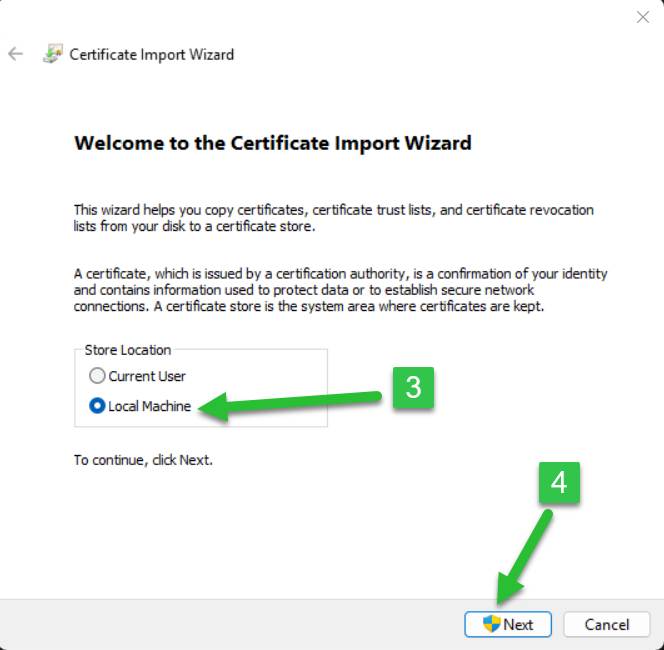
XIII. Install certificate on local machine
- Open the file "public.crt"
- Click "install certificate..."
- Click “Local Machine”
- Click “Next”
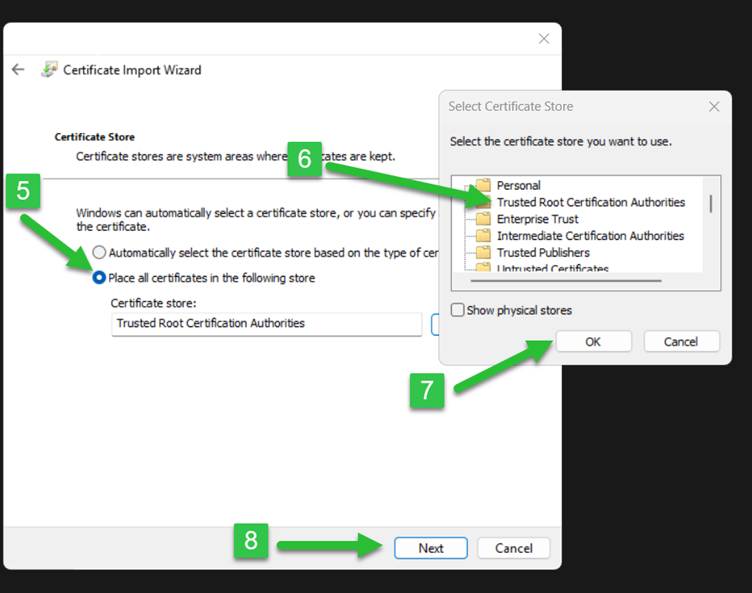
- Select "place all certificates in the following store"
- Select "trusted root certification authorities"
- Click "OK"
- Click "Next"
- Click "Finish", "OK" and "OK"
OPTIONAL: add certificate in Google Chrome so you can enter the camera using HTTPS
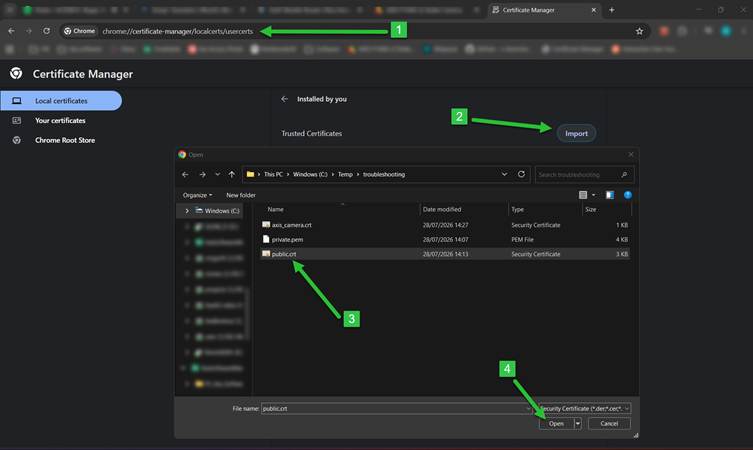
XIV. Open Google Chrome
- Go to chrome://certificate-manager/localcerts/usercerts
- Click “Import” under “Trusted certificates”
- Select “public.crt”
- Click “Open”
Step 6: Back in ibaCapture
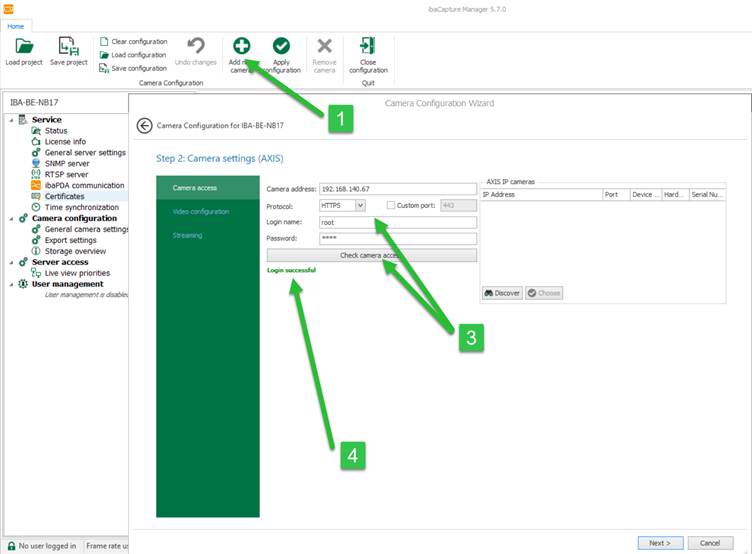
XV. Open ibaCapture and go to:
- Click "Add new camera"
- Select "Axis" and click "next"
- Fill in the camera credentials (protocol HTTPS) and click " check camera access"
- You should get a "Login successful" message
You now got a secure connection between ibaCapture and an Axis camera.
EXTRA:
i-PRO Panasonic HTTPS connection:
- Generate Root_CA in OpenSSL of XCA
- install the generated root_CA In the webconfig of the camera and generate a request file (.csr)
- Use the .csr file in openSSL of XCA to generate a certificate (.p7b)
- Import this .p7b in windows Certification Store
- Export the .p7b from in the Windows Certification Store to a base-64 encoded X509 .CER’ file.
(The .p7b file can't be imported in the camera. You need a .cer file) - Import the .cer file in the camera
- Import the .p7b file into ibaCapture
Was this article helpful?
That’s Great!
Thank you for your feedback
Sorry! We couldn't be helpful
Thank you for your feedback
Feedback sent
We appreciate your effort and will try to fix the article